
 Lo staff


Guida Per Un Setup MFR Realistico
QUI il link alla versione originale in inglese della guida
Introduzione:
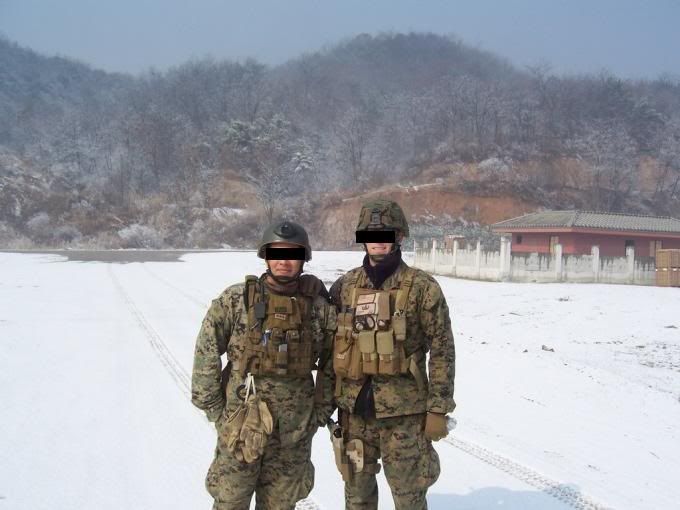
Lo scopo della guida è di aiutare gli utenti del USMC FC nel creare un setup Marine Force Recon (MFR) o Recon Battalion (Recon Bn.) che sia realistico e coerente sotto tutti i punti di vista, dato il numero crescente di setup ispirati a questi corpi d'èlite.
Per praticità la guida ovviamente farà riferimento al tipico setup con M4A1 da rifleman, data anche la scarsità di informazioni e foto riguardanti gli altri ruoli come il support gunner (SAW) o marksman (DMR). Il periodo temporale dei setup parte dal 2002/2003, quando il primo kit FSBE fu sostituito dal kit FSBEII, fino a i giorni nostri (2010). Per chi non lo sapesse FSBE, significa Full Spectrum Battle Equipment, e il kit FSBEII è il suo successore. Gran parte del kit FSBEII è prodotto dalla Eagle Industries e dalla Allied Industries (TRC- The Resource Centre), con laggiunta di altri equipaggiamenti prodotti dalla CSM Gear e/o altre marche meno blasonate.
Inoltre verso la fine della guida verrà spiegato come riconoscere le pouch FSBEII originali da quelle civili o copia (simil FSBEII) cosi da evitare brutte sorprese per chi si avvicina a questo tipo di equipaggiamenti per la prima volta. Ovviamente tutto il kit FSBEII è in Coyote Brown. Largomento dei cosidetti private purchases è stato approfondito già in parecchie occasioni all'interno del fan club, quindi non credo sia necessario parlarne per l'ennesima volta. Quindi di conseguenza la guida si soffermerà quasi esclusivamente su quel tipo di equipaggiamento fornito come standard ad un operatore MFR.
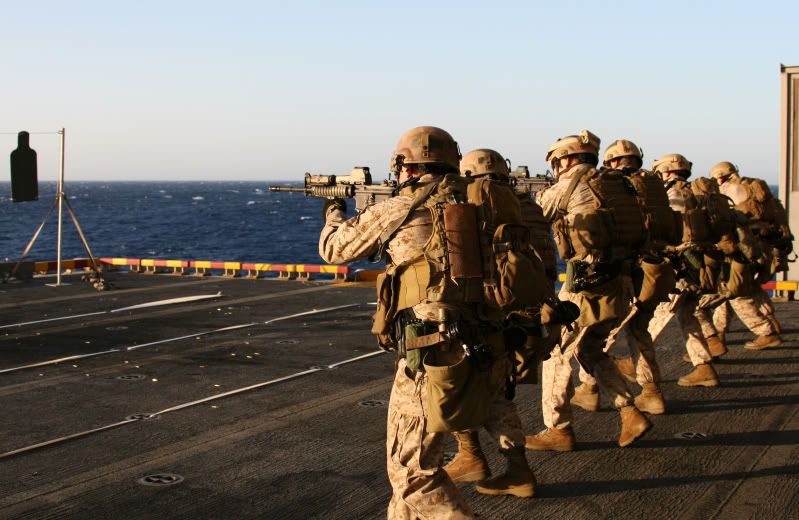
Inizierei subito con una carrellata di immagini !
Weaponry:
Il fucile standard in dotazione è lM4A1 con canna da 14.5. La configurazione CQB, con canna da 10.5 si è vista di rado. Come calciatura per di più si vedono utilizzati i classici calci LE e più raramente i Crane. Come RIS/RAS utilizzano il classico KAC da 7 o il Daniel Defense RAS Mk18, in dotazione col nuovo kit SOPMOD Block II in FDE o Black.
Optics:
- Aimpoint M68 con cantilever mount, L mount o quello standard.
- Eotech 552, Nero, SOPMOD Block I
- Eotech 553, FDE, SOPMOD Block II
- Elcan Specter DR, FDE, SOPMOD Block II
- ACOG TA11E o TA11F
Lasers & Lights:
- Insight AN-PEQ/2
- Insight AN-PEQ/15 (FDE & Black)
- Insight M3X-SU-233
- Surefire M951
- Surefire M961
- Surefire M900
- Surefire G2, Tan (Non montate sul fucile)
Silencers:
- KAC QD Silencer
Support Weapons:
- FN M249 Para
- FN M240
DMR:
- MK11
- MK12
- M40
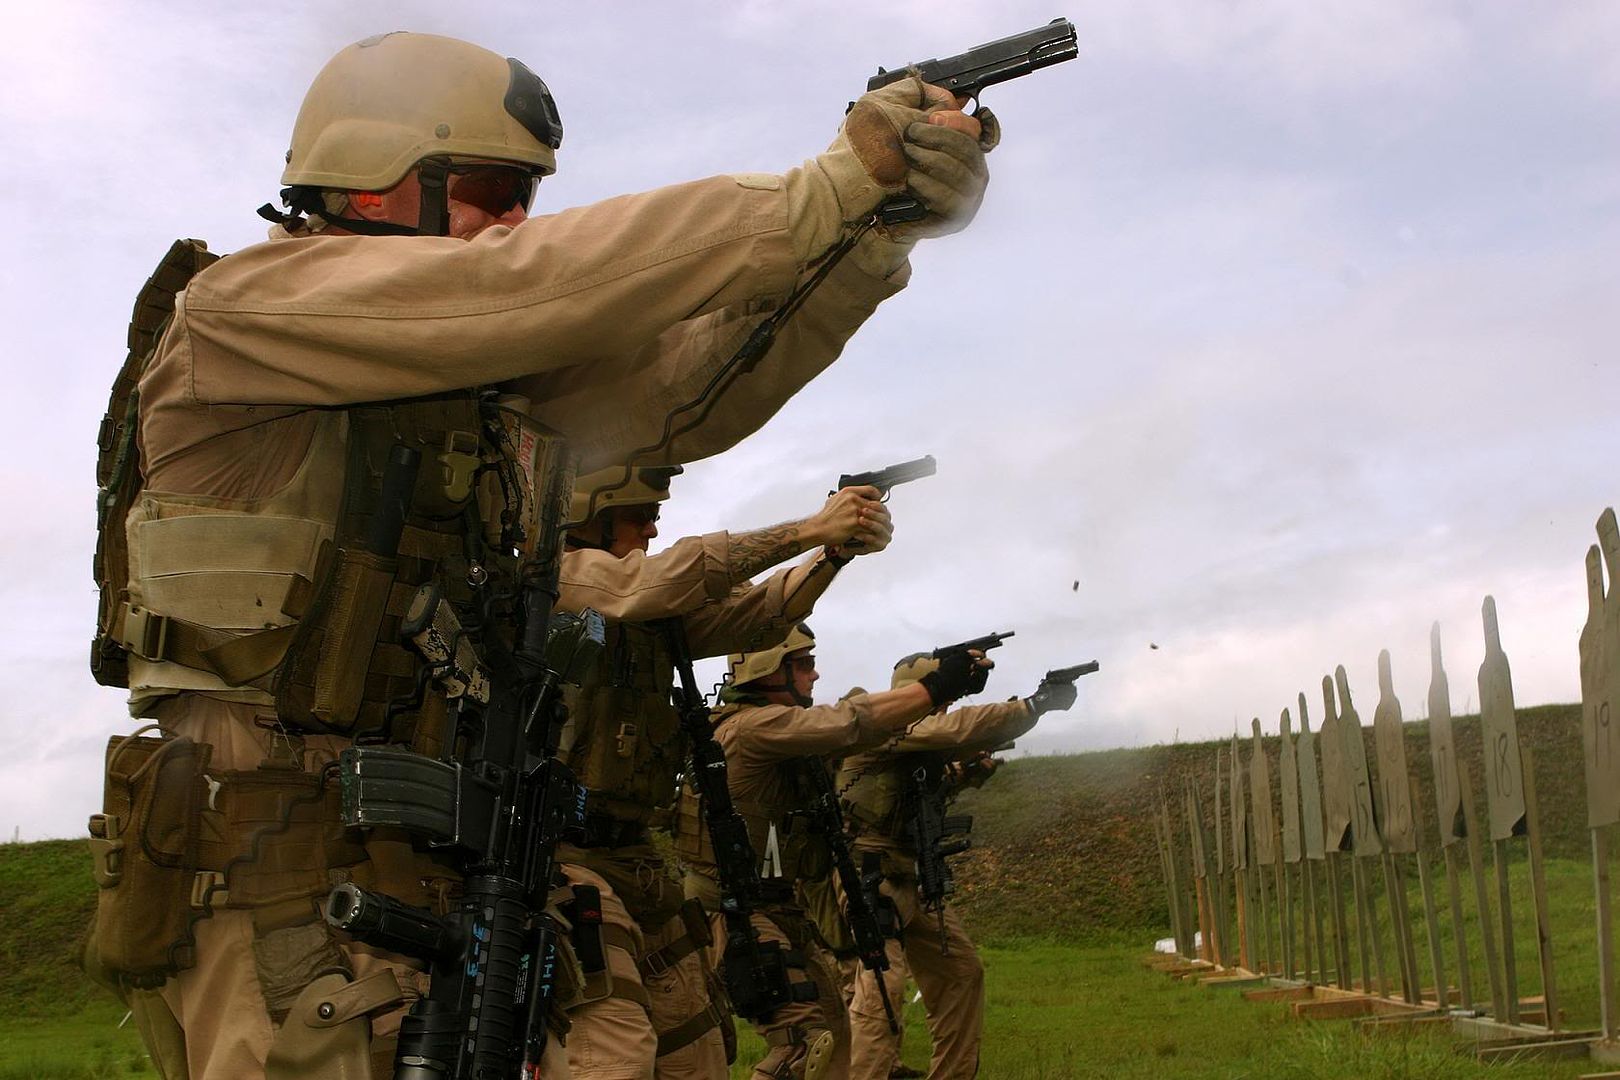
Side Arms:
- 1911 MEU(SOC)
- Beretta 92FS/M9
Side Arms Lights:
- Surefire 610r (6 volt)
- Surefire 310r (3 volt)
- Surefire 612r (6 volt)
Shotguns:
- Benelli M1014
Equipaggiamento:
Eccoci nella parte piu' importante della guida. Nelle seguenti pagine verrano introdotti i vest, le uniformi, gli elmetti, i guanti e relativi accessori facenti parte del kit FSBEII. Ovviamente è appurato che gli operatori tramite i varii private purchases a livello di battaglione o unità, utilizzano anche altro equipaggiamento. Il settaggio dellequipaggiamento e le varie pouches è a discerzione del singolo operatore, ma detto ciò molte volte le SOP (Standard Operating Procedures) dellunità specifica richiedono che, per esempio, lIFAK (Individual First Aid kit) sia posizionata in una determinata parte del vest, cosi da facilitare le operazioni mediche.
Per finire il kit FSBEII ha diverse tonalità di CB, sia tra le varie marche come la Eagle Ind. e la Allied Ind, che i vari lotti di produzione (2004,2005 etc...). Di fatti risulta che lequipaggiamento prodotto nel 2004 risulti più scuro rispetto alle altre annate; questo ovviamente è dovuto dai vari lotti di materiale/cordura che non sono mai identici.
Apparel:
Le uniformi Tru Spec e Propper con taglio ACU sono assolutamente da evitare in quanto non corrette per questo tipo di loadout, o in generale qualunque tipo di loadout USMC. La vera MARPAT, che sia Woodland o Desert, ha il più tradizionale taglio MCCUU e di conseguenza non ha il Velcro sulle maniche. Inoltre, quelle originali, sono facilmente riconoscibili grazie agli EGA (Eagle Globe and Anchor) stampati su tutto il tessuto.
- Woodland MARPAT MCCUU.
- Desert MARPAT MCCUU.
- Desert MARPAT FROG
- Sage Flight Suit. CWU-27/P
- Tan Flight Suit. CWU-27/P
Gloves:
- FSBEII Protech Kevlar SIG Tactical Glove (Shorty - Coyote)
- Oakly SI Assault (Tan)
- USGI Flight Gloves (Sage & Tan)
- Camelbak FROG Gloves
- Hatch SOG L200 (Tan)
- Outdoor Reaserch Overlord Gloves
Vests:
- FSBEII Allied Industries MBSS.
- FSBEII Eagle Industries Land CIRAS.
- FSBEII Eagle Industries RRV-S.
- FSBEII Eagle Industries MCAV. (Raramente utilizzato)
- PACA Low Visibility Carrier.
Pouches:
- FSBEII Eagle Industries Single M4 Pouch
- FSBEII Eagle Industries Single M4 FB Pouch
- FSBEII Eagle Industries .45 FB Pouch
- FSBEII Eagle Industries M9 Pouch
- FSBEII Eagle Industries Smoke Grenade Pouch
- FSBEII Eagle Industries Frag Grenade Pouch
- FSBEII Eagle Industries 40MM Grenade Pouch
- FSBEII Eagle Industries SAW Pouch
- FSBEII Eagle Industries M60 Pouch
- FSBEII Eagle Inustries IFAK/Med Pouch
- FSBEII Eagle Industries Gas Mask Pouch
- FSBEII Eagle Industries Pop Flare Pouch
- FSBEII Eagle Industries SABRE Radio Pouch
- FSBEII Eagle Industries Canteen Pouch
- FSBEII Eagle Industries Horizontal GP Pouch
- FSBEII Eagle Industries Hydration Carrier
- FSBEII Allied Industries Main Assault Pack (MAP)
- FSBEII Allied Industries Admin GP w/light
- FSBEII Allied Industries Admin GP w/out light
- FSBEII Allied Industries Flashbang Pouch
- FSBEII Allied Industries SEA MKII Pouch
- FSBEII Allied Industries ASP Baton Pouch
- FSBEII Allied Industries Bandoleer
- FSBEII Allied Industries Three Mag M4 Carrier (Shingle)
- USMC Allied Industries Grunt Issued IFAK
Belt Kit:
- FSBEII Eagle Industries MOLLE Warbelt.
- FSBEII Eagle Industries Duty Belt w/Belt Pad (khaki)
- FSBEII Eagle Industries E&R Fanny Pack
- FSBEII Allied Industries Dive Belt Pad
- FSBEII Allied Industries Belt Suspenders
- FSBEII Allied Industries Drop Leg Panel
- FSBEII Allied Industries Holster Adaptor
- FSBEII CSM Gear Dump Pouch
- FSBEII CSM Gear Surefire Holster
- FSBEII CSM Gear E&R Fanny Pack
- Safariland 6004-56 (Black/3Col./FDE)
- Blackhawk SERPA
- Gemtech Pistol Lanyard (Black/Tan)
Headgear:
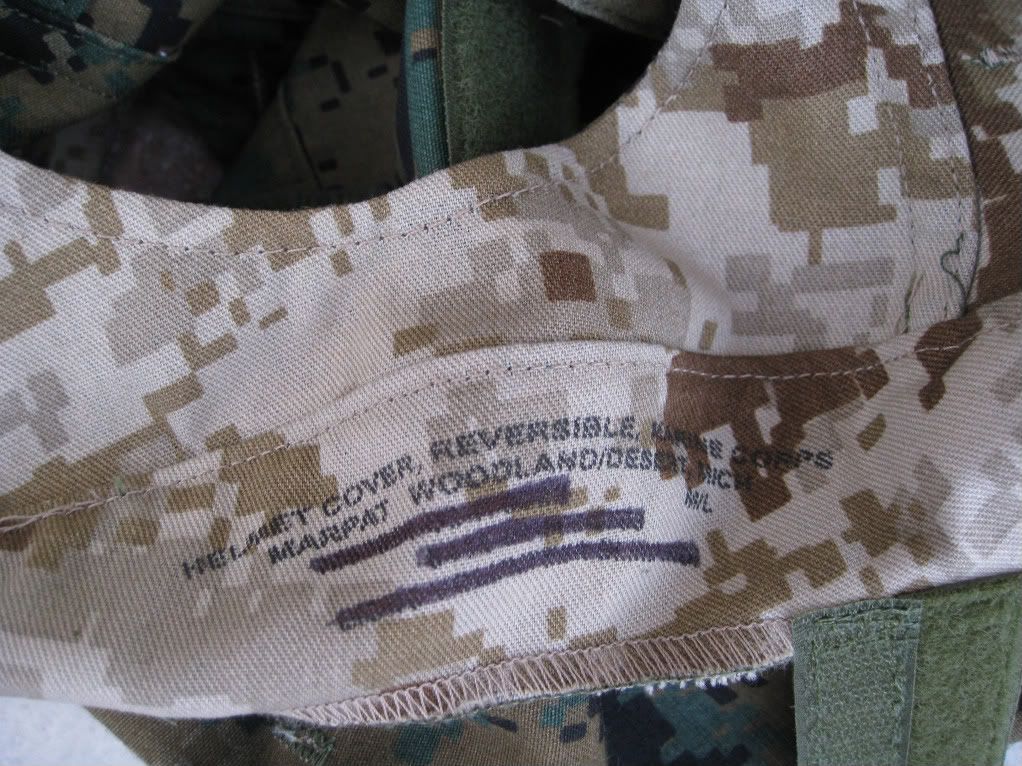
- FSBEII Helmet Cover Reversible
- FSBEII Oakley A Frame Goggles (Tan)
- MICH TC2000 (TC2001 e TC2002 raramente)
- ESS Profile NVG Goggles (Tan)
- Norotos Three Hole Mount
- Goggle Strap Retainers (CB/OD)
Communication:
- MSA Sordin Headset (MRCS)
- MSA Nexus U94 PTT
- Peltor Comtac I and II
- TCI Liberator I and II
- TCI Round PTT
- TEA Maritime Headset
- TEA Maritime PTT
- PRC148 MBITR (Blade & Whip Antenna)
Accessories:
- SEA MKII HABD (VBSS Ops.)
- TFSS (OD & Black)
- Surefire G2 Tan
- ASP Baton
- Benchmade Nimravus e Griptillian (Coyote)
- Gerber Multitool - Det 600 Model 07400
- IR/Standard Chemlights
- VIP Light IR
- CAT Tourniquet
- M40 Gas Mask
FSBEII Items
Come anticipato prima nell'introduzione, gli oggetti facenti parte del kit FSBEII sono appositamente marchiati dalla casa produttrice (Eagle Industries e Allied Industries) con NSN, Contract No. etc... Cosi da poter essere facilmente riconosciuti, e nel nostro caso in modo da distinguerli da quei prodotti presenti sul mercato civile.
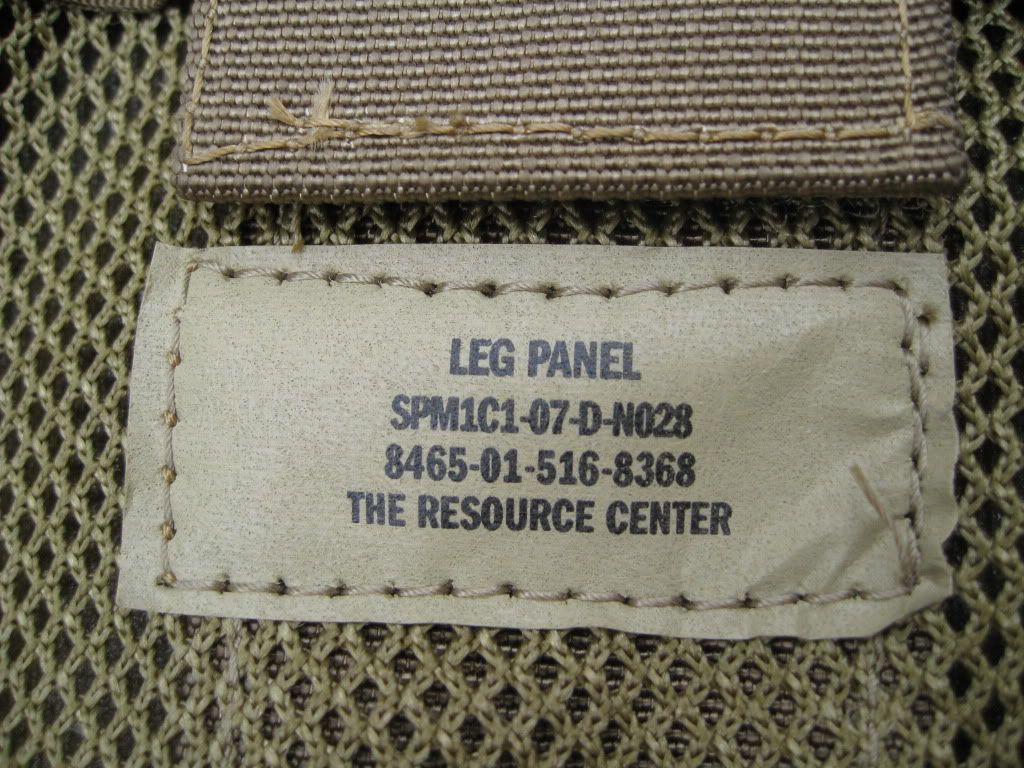
Qui di seguito un Leg Panel FSBEII della Allied Industries. Le etichette della Allied hanno scritto The Resource Center o '7P200' per segnalare che vengono prodotte da loro. Soprattutto sui modelli più vecchi può capitare che la data di produzione sia scritta a mano.
Il format delletichetta è il seguente:
- Item Name
- Contract Number
- NSN Number
- Company Name
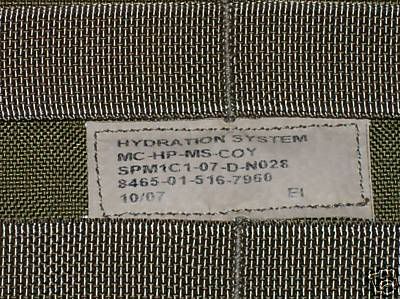
La prossima etichetta invece arriva da un Hydration Carrier FSBEII della Eagle Industries.
Il format delletichetta è il seguente:
- Item Name
- Item Designation
- Contract Number
- NSN Number
- Date EI
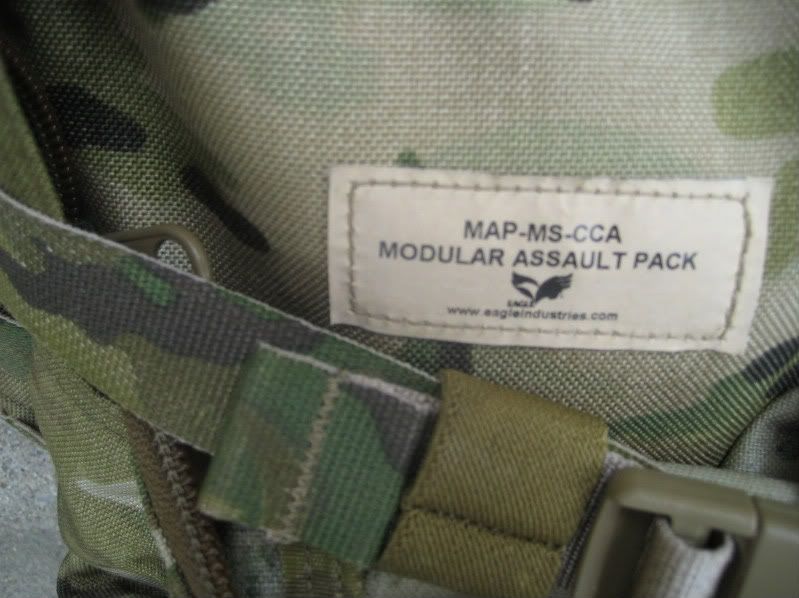
Per avere un riscontro visivo, questa è una foto di un MAP civile in multicam prodotto sempre dalla Eagle Industries.
Può capitare a volte che la roba EI non abbia etichetta, e quindi di conseguenza vi dovrete fidare della parola datavi dal venditore. Detto ciò anche gli oggetti EI che non hanno letichetta grande visible, dovrebbero in ogni caso avere un'etichetta piccola con un codice numerico come "467"
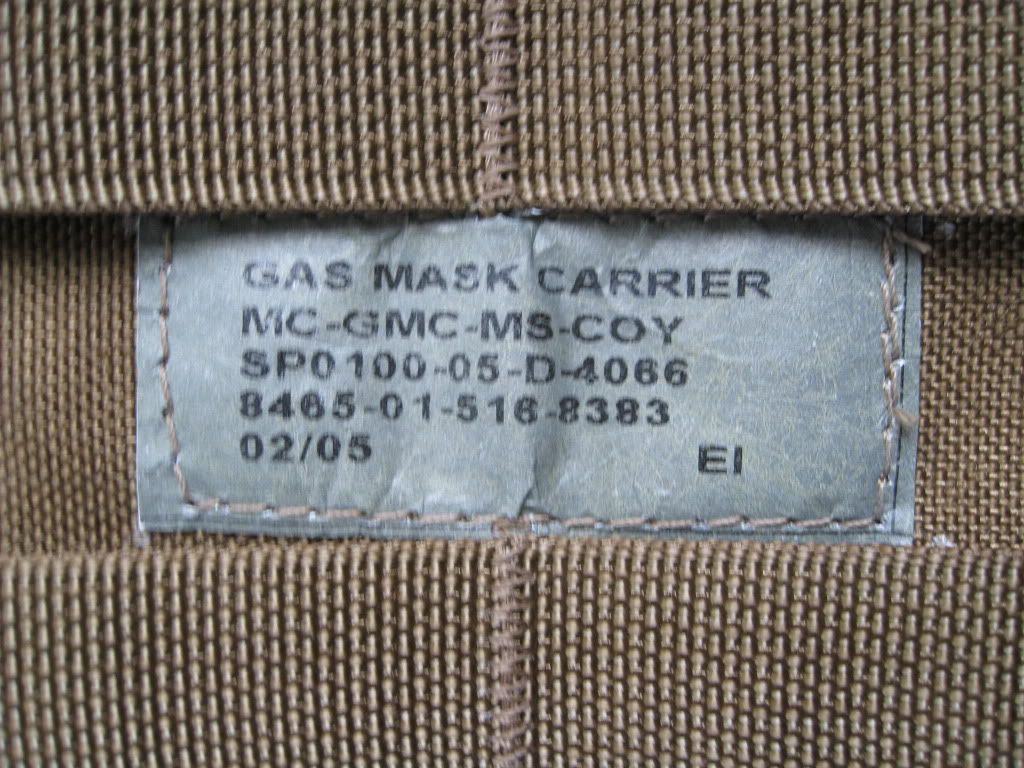
Da notare se letichetta è blu/verde, vuol dire che l'oggetto in questione appartiene ai lotti di produzione del kit FSBEII datati 2004/2005, e quindi di conseguenza hanno un valore maggiore. Questa particolare etichetta verde è presente solo sui prodotti EI, mentre sul materiale FSBEII della Allied Industries è del classico colore (anche nei lotti 2004/2005). Lunica differenza è appunto come accennato in precedenza, il colore della rete dietro al leg panel e all'interno dei MAP prodotti nel 2004/05 è Verdina e non CB/Tan come adesso.
Immagine delletichetta FSBEII Eagle Industries verde sulla gas mask pouch.
Numero di Identificazione (NSN)
LNSN è il National Stock Number, e permette lidentificazione di ogni pezzo. Il kit FSBEII è composto da tre diverse configurazione, A,B e C. La lista che segue vi permetterà di determinare se una vostra pouch è realmente parte del kit FSBEII qualora ne aveste il dubbio.
FSBEII Configurazione "A"
FSBEII Configurazione "B"KIT,FULL SPECTRUM BATTLE EQUIPMENT (FSBE), INDIVIDUAL CONFIGURATION "A" COMPLETE, CONTAINS THE FOLLOWING COMPONENTS:
4220-01-517-6883 LPU-34 FLOTATION COLLAR P/N: 0103100-5;
4220-01-517-4157 FLOTATION COLLAR HARNESS;
4220-01-517-2925 AIR BOTTLE;
5965-01-517-4269 EAGLE HEADSET (LOW NOISE);
5935-01-517-5293 SORDIN HEADSET (HIGH NOISE) W/QUICK DISCONNECT;
5930-01-517-5400 PUSH-TO-TALK (PTT), P/N: E3-MK-REV3A;
6150-01-517-4963 CABLE, 27 IN, TO PTT;
5995-01-517-4231 CABLE, PRC 148 (MARITIME-10 PIN);
5995-01-517-4265 CABLE, PRC 148 & ICS (URBAN- 6 PIN);
5895-01-476-6124 MICH LAND COMMS HEADSET (LOW NOISE);
8465-01-516-7955 BAG, KIT;
8465-01-516-7959 PACK, PATROL;
8465-01-516-7960 HYDRATION SYSTEM;
8465-01-516-7961; POCKET, AMMUNITION MAGAZINE (BANDOLEER AMMO POUCH);
8470-01-516-7966 VEST, SMALL ARMS PROTECTIVE BODY ARMOR (RHODESIAN RECON VEST);
8465-01-516-7967 POUCH, FRAG GRENADE, SINGLE;
8465-01-516-7968 POCKET, RADIO, MBITR;
8465-01-516-7973 POUCH, SAW, W/DET TOP;
8465-01-521-3530: MC-MEDP-MS-KH POUCH, MEDICAL, INDIVIDUAL;
8465-01-516-7974 POCKET, AMMUNITION MAGAZINE (POUCH, AMMO, SHOTGUN, 24 RDS);
8465-01-516-7976 POCKET, GP MEDIUM;
8465-01-516-8368 LEG PANEL;
8465-01-516-8370 POCKET, AMMUNITION, MAGAZINE (POUCH, MAG, M-4, SINGLE/DOUBLE);
8465-01-516-8371 POCKET, AMMUNITION, MAGAZINE (POUCH, MAGAZINE, 45 SINGLE);
8465-01-516-8374 POCKET, FLASH BANG;
8465-01-516-8376 POCKET, SEA MKII;
8465-01-516-8377 ADAPTOR, MOLLE DIVE BELT;
8465-01-516-8380 BAG, E & R;
8465-01-516-8382 POUCH, SMOKE GRENADE;
8465-01-516-8383 CARRIER, CHEMICAL-BIOLOGICAL MASK;
8465-01-516-8384 POCKET, AMMUNITION, MAGAZINE (POUCH, M-60 AMMO);
8465-01-516-8385 BELT CATCH, SLUNG;
8465-01-516-8415 CARRIER, MODULAR, 3 MAG M-4A1;
8470-01-516-8453 POCKET GP MBSS W/LIGHT HOLDER;
8470-01-516-8454 POCKET GP MBSS W/O LIGHT HOLDER;
8470-01-516-8452 MODULAR ASSAULT PACK.
KIT,FULL SPECTRUM BATTLE EQUIPMENT (FSBE), INDIVIDUAL CONFIGURATION "B" COMPLETE, CONTAINS THE FOLLOWING COMPONENTS:
8465-01-516-7955 BAG, KIT;
8465-01-516-7960 HYDRATION SYSTEM;
8465-01-516-7961 POCKET, AMMUNITION MAGAZINE (BANDOLEER AMMO POUCH);
8465-01-516-7967 POUCH, FRAG GRENADE, SINGLE;
8465-01-516-7969 POCKET, RADIO (SABR);
8465-01-516-7973 POUCH, SAW, W/DET TOP;
8465-01-521-3530 POUCH, MEDICAL INDIVIDUAL;
8465-01-516-7974 POCKET, AMMUNITION MAGAZINE (POUCH, AMMO, SHOTGUN, 24 RDS);
8465-01-516-7976 POCKET, GP MEDIUM;
8465-01-516-8368 LEG PANEL;
8465-01-516-8370 POCKET, AMMUNITION MAGAZINE (POUCH, MAG, M-4 SINGLE/DOUBLE);
8465-01-516-8372 POCKET, AMMUNITION MAGAZINE (POUCH, MAGAZINE, 9MM);
8465-01-516-8374 POCKET, FLASH BANG;
8465-01-516-8377 ADAPTER, MOLLE DIVE BELT;
8465-01-516-8382 POUCH, SMOKE GRENADE;
8465-01-516-8383 CARRIER, CHEMICAL-BIOLOGICAL MASK;
8465-01-516-8384 POCKET, AMMUNITION MAGAZINE (POUCH, M-60 AMMO);
8465-01-516-8385 BELT CATCH, SLUNG.
FSBEII Configurazione "C"
KIT,FULL SPECTRUM BATTLE EQUIPMENT (FSBE), INDIVIDUAL CONFIGURATION "C" COMPLETE, CONTAINS THE FOLLOWING COMPONENTS:
8465-01-516-7955 BAG, KIT;
8465-01-516-7960 HYDRATION SYSTEM;
8465-01-516-7961 POCKET, AMMUNITION MAGAZINE (BANDOLEER AMMO POUCH);
8465-01-516-7967 POUCH, FRAG GRENADE, SINGLE;
8465-01-516-7976 POCKET, GP MEDIUM;
8465-01-516-8368 LEG PANEL;
8465-01-516-8370 POCKET, AMMUNITION MAGAZINE (POUCH, MAG, M-4 SINGLE/DOUBLE);
8465-01-521-3530 POUCH, MEDICAL INDIVIDUAL;
8465-01-516-8383 CARRIER, CHEMICAL-BIOLOGICAL MASK;
8465-01-516-8384 POCKET, AMMUNITION MAGAZINE (POUCH, M-60 AMMO);
8465-01-516-8385 BELT CATCH, SLUNG.
Sistemi Di Comunicazione (Headsets)
FSBE (full spectrum battle equipment) headsets
FSBE eagle headset 8465-01-519-6918
FSBE eagle headset 5965-01-517-4269
FSBE sordin high noise headset 8465-01-519-6922
FSBE sordin high noise headset 8465-01-519-6876
maritime MICH headset with neck band 5965-01-549-1249
television equipment associates maritime MICH headset 5895-01-505-2108
FSBE parts and cables
television equipment associates pust to talk button 5930-01-517-5400
television equipment associates push to talk button for single MBITR 5895-01-505-2123
television equipment associates intercom 10in cable 5995-01-505-2121
television equipment associates PRC-148 single comm cable 5995-01-517-4231
television equipment associates PRC-148 dual comm cable 5995-01-517-4265
television equipment associates PRC 36in family cable 5995-01-517-4914
Per finire la prima parte della guida ecco un'interessante AAR (After Action Report) da un gruppo di MFR al proprio ritorno dall'Afghanistan. Anche se si parla di FSBE e non di FSBEII.
Force Recon in Afghanistan notes
From: 2nd Platoon 1st Force Reconnaissance Company, 15th MEU (SOC)
To: Commanding Officer, 1st Force Reconnaissance Company
SUBJ: WEAPONS AND EQUIPMENT AFTER ACTION REPORT
1. The following after action report will discuss the arms and equipment issued to 2nd Plt., cover the good and bad points of each piece of gear and describe how each was used by the Plt. Learning points discovered during the course of 2nd Plts work up and deployment will also be discussed. The after action comments are broken down into the following sections:
( A ) Weapons
( B ) Optics
( C ) Communications
( D ) Equipment
( E) Equipment deficiencies
A. WEAPONS
1. M4-A1 CARBINE- This weapon proved more than mission capable. We replaced 3 cracked bolt faces out of 28 weapons. Two of the cracked bolt faces occurred during our CQB package. This is to be expected in weapons after firing in between 10,000-20,000 rounds due to higher chamber pressure experienced with the M-4A1 using the standard M-16 bolt. It is my understanding that Colt is producing a new bolt that will stand up to more abuse. Until this is corrected we must ensure all weapons are carefully checked prior to issuing, and during JLTI upon returning from the MEU. There is noticeable pitting on the surfaces of the bolt and firing pin in all weapons. One weapon had to be switched out due to its inability to maintain a zero. We were unable to determine the cause. The extended charging handle works very well, however, it needs to be reinforced. The repeated strain placed on the pin caused it to break in 5 of our carbines. These pins are easy to replace and are available through the MEU or BLT armomers
SOPMOD KIT
a. RAIL ADAPTER SYSTEM (RAS)- Worked very well. Generally optics attached, zeroed and then removed returned to within 1 MOA as promised when the optic was returned to the same location and tightened to the same degree. One tendency was for Marines to want to remove the RAS Assembly often for cleaning. This should not greatly affect the accuracy however, I advise against it. The lower portion of the RAS can be removed and the inside cleaned adequately with a cloth or compressed air. While no Marine should be found without a functionally clean weapon The Marine Corps attitude towards impeccably clean weapons leads to over-cleaning with improper solvents and shortens the life of the weapon. If we want to see spotless weapons, visit a unit that doesnt use them.
b. VERTICLE FORE GRIP- While I was skeptical at first, this piece of gear is invaluable. It improves weapons controllability and because it is easy to grasp, it makes it easier to use the non-firing hand to give hand and arm signals while maintaining a fighting grip on the weapon with the strong hand.
c. VISIBLIE LIGHT ILLUMINATOR- This light works well when it works. The VLI provided an incredible advantage to the Plt. when conducting Highway Interdiction Operations. This light is extremely bulky and temperamental. Over half of the platoons VLIs have needed replacement since the beginning of the training cycle a year ago. The problem with the light inadvertently being switched on has not been adequately solved. We experienced very few white light N.D.s, however we taped both the lens as well as the light switch, and this takes time to undo.
d. BACK-UP IRON SIGHT- This sight works well as a back-up sight. We conducted drill in with it with little to no problems.
e. SLING- All Marines in the Plt. replaced the issued sling with a simple, single point sling. This proved a much better design. A commercially available sling from The Wilderness seems to work better than the homemade version. There are attachment points available that mount at the base of the receiver and are much more sturdy that the flex cuffs most of the Marines used.
f. SUPPRESSOR- Suppressors worked well with little affect on the weapons impact. They were used during some MSPF Operations and were carried during patrols should it become required to eliminate a guard or dog. One suppressor became rusted after apparently getting wet inside the rucksack. The suppressors must be lubricated on the outside and dried if used in rain or if water is used in them. These can be left in the sun to dry or placed in an oven to dry them out
2. M-203- Due to the rough terrain and the fine sand we had a few problems. The muzzle needs to be taped up, and regular cleanings were required to keep sand from getting into the working parts of the 203. During a vehicle patrol it is recommended that several cans of spray air be kept for this purpose. Due to the lack of weapons racks in the vehicles at times, in rough terrain, weapons would bounce around. On one M-203 the small pin in the front assembly was damaged. The M-203 functioned, however we were not certain if it was functionally safe. If the M-203s are to be removed it is vital that the Marines understand that they must maintain accountability of the cam plate in the quick release assembly.
3. M-79- Very good for vehicle patrols. It proved to be easy to manipulate in the front and rear of the vehicle. The vehicle commander primarily used the weapon
4. MEU (SOC) .45- These weapons are notorious for stoppages caused by broken parts. The following replacement parts are essential for deploying Plt. armorer: buffer pads, spring guide rods, barrel bushings, springs, extractors, firing pins, firing pin springs, firing pin stop plates. The 15th MEU did not have an armorer qualified to work on our pistols. With these parts generally any problem that arose with the pistols could be fixed. The most likely problem that cannot be repaired by the Plt. armorer is broken barrel-locking lugs. This problem is caused in part by use of the hot TZZ ammunition and the fact that the slide lock pin used with the Sure-Fire light it not custom fit to the weapon. This creates play in the pin and places excessive strain on the barrel-locking lug.
Replacement of the buffer pad about every 300 rounds also significantly reduces wear on the extractors and spring/guide assembly. This prevents many of the malfunctions from occurring. Locktight on the rear sights was helpful as the adjustable rear sight has a tendency to vibrate itself loose. In the past we have sent Marines to LAPD SWAT to work with the armomers and learn how to repair common problems. We coated the front sight with a high visibility orange paint marker. This seemed to speed up sight acquisition especially during low visibility.
a. .45 SUREFIRE LIGHT-The Surefire light for the .45 was unreliable. The design of the pressure pad and wire causes them to easily break or short out. On several of the lights we used spare pressure pads from the AN/PEQ-2 that had more flexible wire, and had the Electricians on the ship replace the pressure switch. This more flexible wire was much more effective.
5. MP-5- These weapons were fired several times on ship in order to give a familiarization to the Marines who had not fired them, and in the shooting house in Darwin Australia where 5.56 ball is not authorized. They may also be useful in the event that the Plt. is tasked with conducting a PSD in which case the MP-5 may be preferred. We are rapidly running out of Marines who are experienced with the MP-5. I recommend that during the Weapons and Tactics package a familiarization of the MP-5 be conducted so that all Marines at least understand it function and have fired it before deploying.
6. 12 GAUGE SHOTGUN- We had little opportunity to use these due to unavailability of lockbuster ammunition. We experimented with Less Lethal baton and beanbag rounds, which will penetrate hollow core wooden doors however; I do not know it they could be reliably used. An unauthorized solution would be to make our own Lock buster rounds as LAPD SWAT does (or used to) with dental plaster.
7. M-40 A1- We had several opportunities to fire the M-40s. One item noted was that the MEU has several lot numbers of Match and Special Ball ammunition. This should be checked with the MEU ammo tech. And ammo should be requested by lot number to insure continuity of ammunition. Our Plt. Deployed with no night vision capability for our sniper weapons, and without the dovetails required to mount the KN-200F SIMRAD. In a recent Night Vision Conference the subject of Sniper night vision was discussed. I sent a recommendation for the purchase of the AN/PVS-10. The AN/PVS-10 is a day/ night scope that allows the sniper to use a single aiming point, and transition from day to night observation with a turn of a switch. Currently the addition of a MILSTD 1913 rail is required to mount AN/PVS-10 on the M-40 A1. Additionally, a separate mount is required to achieve the proper angle. I don't know if the M-40 A3 will have this requirement, but if we are going to purchase more AN-PVS-10's we should ask Litton modify the optic so that it will mount to the weapon with out this requirement. Additionally, Litton is developing a new 3rd Gen+ tube that I believe is termed an Un-gated, Filtered tube which allows excellent observation even when looking into bright light (i.e., a man standing in front of a vehicle with its headlights on.) This should be required on any optics that we purchase.
8. M-82 A1- Was taken on the vehicle patrols, and carried in the Pelican case. The weapon was bounced around during transit. We were planning to use this weapon during road interdiction operations to stop fleeing vehicles, but did not have the opportunity. We were unable to fire the weapon to determine if it maintained its zero. The AN/PVS-12 should be purchased as a day/night optic for the SASR.
9. M-249- The Parasaw was used during patrolling and I.A. Drill training. It performed well and there were no complaints.
10. M-240G- The 240 was mounted for our vehicle patrols. The weapon preformed well. It is recommended that if it is to be employed the variant with butterfly trigger be used, as it gives the gunner more freedom of movement in the vehicle. This would create a problem if the vehicle had to be left behind and the weapon carried. The new weapons mount may solve this problem.
11. MK-19- We did not deploy with our own weapons and had to temp loan them from the MSSG. The MK-19 worked well as a vehicle mounted weapons system however, we had a few problems. When not in use the gun was covered by a desert pack cover to keep out as much dirt and sand as possible. Due to the fine sand the weapons were only lightly lubricated with LSA. Due to rough terrain and bouncing, the rounds became off center on the links. This caused numerous malfunctions. It is recommended that the Company acquire its own weapons and that a gun cover be produced that will be easily removable, but sill keep sand and dirt out of the weapon while vehicle mounted. Additionally, ammunition on the gun must be checked daily for serviceability.
12. HS .22 PISTOL- These were never used. We should consider doing away with these and purchasing several threaded 9mm Beretta barrels and suppressors.
13. SIMUNITIONS KIT- The training received during the CQB package with the simunitions kit was invaluable. Care must be taken to ensure plenty of live fire training is conducted as well because bad habits are easily developed. In the past we have experimented with their use during green side I.A. drills. This training is also effective however, it is limited to extremely close range due to the limitations of the round. Often a paint round will rupture inside the barrel. This effectively removes the weapon from the fight. The best method of clearing this is to run several patches coated in acetone through the barrel. The biggest complaint with the Simunitions was that the masks issued are in terrible shape. The lenses are badly scratched and fog so easily that it is difficult to see with them on. This is especially true during an extended movement to an Obj. This meant that SOTG would usually not allow contact prior to the LCC. It would definitely enhance the training of the MSPF if the game was on from insert to extract.
B. OPTICS
1. AIMPOINT- The Aimpoint performed well. They were frequently removed and replaced with very little loss of zero. The aimpoint seemed to be among the most durable of the optics. One was used during the road interdiction operation and was very easy to pick up even with fire burning in the background. Problems with the aimpoint included flimsy wire connecting battery cap and windage and elevation adjustments are prone to breaking which can lead to loss of the caps. The On/off switch has tendency to loosen, which causes Aimpoint to turn of and on or change intensity while firing. This can also easily be fixed by removing the switch cap, tightening the operating pieces of the switch and replacing the switch cap, all accomplished with standard size allen keys. Batteries should be removed after use. Zeroing was most often done on the target included in the SOPMOD manual. The newer version of the Aimpoint has better point of attachment for the caps and a much longer battery life. The lenses have a tendency to easily scratch. A clear sacrificial cap is needed for both the front and back lenses.
2. ACOG- The ACOG worked very well for patrolling and was easy to zero. One item to be noted is that when zeroing the ACOG at 25M the 300 M reticle line must be used. Several Marines accidentally used the center (100 M) reticle and obviously had problems when we moved to confirm the zero at range. Problems with the optic are that the smaller 200-600M reticle lines are difficult to pick up. The iron sights on top are not very useful. The optic must be removed before the BIS can be used. The ACOG should be tightened with a screwdriver instead of pliers. A hand-tightening knob should replace the current screws. There are several good BZO targets for the ACOG in the SOPMOD manual. The best are the ACOG specific targets designed to be used at various ranges.
3. REFLEX SIGHT- The only time that we used the reflex sight was as an optic for the simunitions kit. The dot is very hard to pick up rapidly, especially during dusk/dawn and upon leaving a lighted area before the eyes adjust to darkness.
4. AN/PEQ-2- The AN/PEQ-2s worked very well with the helmet mounted AN/PVS-14s. We conducted several night shoots on the ship with them. They seem to be easiest to zero when mounted on the left hand side of the RAS. The only time mounting on the right side might be advised is if the M-203 is used. The AN/PEQ-2 seems to loose several inches from zero if it is removed. Several were left on throughout the work up and deployment with no loss of zero. The blue high power limiter located on the function switch can be flipped to the black side with a small allen wrench. This allows the high power settings to be used. We switched ours prior to entering Pakistan. In the high settings the aiming point and illuminator worked very well, and seemed to have no affect on zero conducted on the lower settings. Again the zero target in the SOPMOD manual worked well. The dot should be zeroed first then the Illuminator adjusted to the center the beam on the dot. As with all of our watertight optics, batteries must be removed prior to storage, or the heat and humidity changes can cause the batteries to severely corrode the battery chamber. The waterproof plug that inserts in the pressure switch port is small and easily lost. These should be hard wired to the optic, or a large supply of spares sent with each Plt. These must be used in order to prevent damage to the optic. The port must be cleaned regularly as a small amount of moisture will quickly corrode the port. The illuminator became very useful in low illumination situations. It was used in Jakobabad, Pakistan while in security positions. Several filter straps broke, limiting their usefulness. These are very valuable because they block the beam from being seen from the sides.
5. AN/PVS-14- The AN/PVS-14s were used extensively helmet mounted, head mounted and hand held. We did not use them mounted on the M-4. The modified helmet mount for the MICH helmet worked very well. The optic should be dummy corded to the helmet. In the hand held mode the 3&5 power magnifiers darken the picture somewhat, but they worked well. The magnifiers are to heavy to be used head mounted and the magnification obviously makes walking with them on difficult. The only problems we experienced were with the battery box covers which are flimsy and do not close securely. In cold weather the o-ring on the battery cover needs to be lubricated to allow it to close properly. A small tube of silicone would be useful, however, in lieu of that, carmex lip balm seemed to work well. The helmet mount swing arm is easily broken. The optic should not be left attached to the helmet when the helmet is not being worn, and spare swing arms should be given to each Plt.
6. AN/PVS-17- The AN/PVS-17s worked well and was used by some Marines exclusively for patrolling both day and night. A report that I received stated that SEAL teams were experiencing a high failure rate with the PVS-17. This was blamed on using the optic during daylight. We frequently did this and experienced no problems. It is essential when zeroing this optic that it be mounted completely forward of the BIS. Failure to do this will cause serious deviations while attempting to zero the optic. As with all of our watertight optics, batteries must be removed prior to storage, or the heat and humidity changes can cause the batteries to corrode the battery chamber. The PVS-17 was used on the Highway interdiction Missions. The aiming dot remained visible with fire in the immediate background. Some Marines experienced problems during BMNT/EENT, because it was too bright for the daylight cover to be off and too dark for it to be on.
7. SOFIE- It proved incredibly useful in low light operations. The SOFIE was invaluable, as it allowed the Marines to see many kilometers ahead of the vehicle. Additional batteries and a more rugged / mobile battery charger is needed to efficiently charge batteries in the field and while on the move. We were able to make an adaptor for the IFAV to hook up the charger however; it was temperamental and could not take a lot of bouncing around.
8. SOFLAM- We did not have the opportunity to designate any targets with the SOFLAM in Afghanistan however, we did use it during training and it was used to accurately determine range. It performed well, but is too large to be pulled out constantly just to determine range. A smaller laser range finder (Like the Viper) is needed.
9. NIGHT STAR- We were not able to deploy with the Night Star. It would have been extremely handy.
10. KOWA SCOPE- These Scopes worked very well. In the desert the mirage makes observation difficult during the heat of the day especially on the higher power settings. In one of our scopes the 20x to 60x eyepiece stripped and the entire scope became inoperable.
11. M-49- First fielded in 1949. That is prior to the Korean War. Need I say more?
12. 7X50 BINOS- Experienced no problems
13. TASCO BINOS- Experienced no problems
14. GCP This was carried on all patrols and worked well however, the ANPEQ-2 when used on the high power setting works almost as well.
15. AN/PEQ-4- This was used during amphib training as a signal to that scout swimmers were on the beach. If it is to be used as a signal instead of a radio it must be determined if the enemy has night vision capabilities and weather NODs or DFing is the biggest threat. When these are used in amphib ops, the pressure switch plug must be in place. If not the inside of the switch becomes badly corroded. The optic must be thoroughly rinsed and dried after use especially in the pressure switch connector. This can be dried and cleaned with q-tips. 2nd Plt. was issued several AN/PEQ-4s that were unserviceable and had to be switched out.
C. COMMUNICATIONS
1. AN/PRC-119F- Used as needed for inter-vehicle comm.
2. AN/PRC-117- No problems
3. AN/PRC-138-No problems
4. AN/PRC-148- The AN-PRC 148 MBITRs were carried as a survival radio only during patrol due to limited battery life. They were used on several occasions as inter-Plt comm. and worked well. It was noted that when used in the freq-hop mode they seemed to loose time frequently.
5. AN/PSN-11- The Garmin was primarily used for navigation, however the plugger was carried as a back up and used to in the slant/range/calc mode to determine distant positions.
6. SIDS- The SIDs was used very effectively during our MEU work up. Our R&S assets were able to send real time photos to the Assault Element.
D. EQUIPMENT
1. FSBE KIT
a. FSBE VEST- The vest was worn extensively by the Plt. during CQB operations as well as mounted patrolling. Over all, the vest was comfortable and is a vast improvement over the old Point Blank vest. The cut away system worked well. There were not sufficient quantities of large sizes available. The biggest complaint with the vest was the stitching that began to come loose after extended wear. The newer prototype that I saw prior to deployment had an external cummerbund that pouches could be attached to. This will probally improve the fit of the vest. The first version had an internal cummerbund. This worked very well but was removed when the cut away modification was made. If the current side closure system is to be maintained the fastening system should be reversed so that the individual Marine can cinch down the vest himself. There was talk of removing the insert from the shoulders that would allow for a more low profile fit. This is recommended. As we were deploying to a desert area we painted much of our equipment to match the terrain. We should have desert covers for the vest.
b. RAC SYSTEM- The rack system worked very well and was worn by many Marines during many different operations. The same stitching issues were present as with the vest. Again these should be made in desert material.
c. FSBE POUCHES- The pouch quality was probably the biggest problem. Stitching came loose and the thin material of the pouches wore through quickly especially when dragging a simulated causality. One problem with the FSBE system is that Marines have to frequently switch pockets back and forth. The modular system works well in that it allows the gear to be set up as needed by the individual Marine, however if more pouches were available, both the vest and RAC could be set up and pouches changed only when needed rather than each time it is required to wear one or the other. As with the Vest and RAC, desert camo pouches should be available. The types of pockets and pouches available worked well and many were useful during Green side OPs as well as CQB. Because of this the gear is used much more than the old gear was and many of the pouches will need to be surveyed more frequently. We should keep a large supply of replacement pouches on hand. The Fag Bag issued with the FSBE works well for some things, but because it has only one large pocket it is difficult when many small items are carried in it. An improved version should include several smaller pouches that would assist in organizing gear. Also the waist strap should be modified with MOLLE attachment points to allow small items like flash bangs to be attached. A breacher pouch designed to hold a firing system with elastic loops would be useful.
d. KNEE/ELBOW PADS- These worked well however, after extensive use the elastic and Velcro begins to wear out well before the pad itself. If replaceable straps were available we would save a lot of money in the long run.
e. HABD BOTTLE -We experienced no problems with the Long-Hose version.
f. DAY PACK- The daypack worked well for transporting radios and, breaches. The low profile made fast roping from the hell-hole easy. However we had to modify the attachment system to ensure that it would not restrict the ability to cut away the vest as per the HRST SOP. The MOLLE medical pack was superior for medical purposes and may work better for breachers.
g. LPU/34-P- The LPU is bulky and causes some problems with weapons manipulation. We wore the LPU only when required. If time was available after going feet dry, we removed the FSBE vest prior to boarding and used the A/C flotation and donned the FSBE after going feet dry. This also saved wear and tear on the LPUs. When time was not available (VBSS, Obj close to shore) the LPUs were worn. During training shoots should be conducted wearing the LPU. This will allow the Marine to become familiar with any difficulties he will experience. If the LPUs were to be worn the buddy system was used for donning and each Marine received a HRST Master check developed by SSgt Pope. This was similar to a JMPI and checked to ensure that all equipment was worn properly and would not become fouled if the vest was ditched. The HABD bottle was also checked at this time. Although all Marines had received the required FSBE training we were not allowed to wear the equipment in the Helo dunker. We did however; conduct shipboard Helo egress training and ditching of the FSBE.
2.MICH HELMET- The helmet, like the vest was worn extensively during DA missions as well as vehicle patrols. It was comfortable however; a wider variety of pad thickness is required. The pads became hard during cold weather when the helmet was not worn. We were given a large package of spare plastic buckles. These came in handy as they break often.
a. MICH COMM SYSTEM- 2nd Plt. was the first to be issued the MICH COMM system and used it extensively during the work up. Our after action comments about the system were given to the designers and for the most part these remain unchanged. We used the MICH system during some of our shoots on the ship, flow-drills, and in the house in Darwin. The high noise works well as long as you don't have to have it on for too long. It is far too uncomfortable to be worn during a long duration vehicle patrol. Additionally, the high noise picks up some of the noise from the vehicle. The low noise version was not used extensively. In my opinion in order to hear it the volume had to be turned up too loud during CQB operations, and in green side ops (when required) I preferred the MBITR swimmers head set although, this does not have the required connector to adapt to any other radio.
b. MICH MODIFIED AN/PVS-14 MOUNT-The modified AN/PVS-14 Mount worked very well however, when we mounted them, the proper screw and sleeve were not available so we used alluminum screws and sleeves purchased at Home Depot. These had a tendency to strip after repeated use. A helmet cover should be designed that does not require the mount to be removed in order to change the cover from woodland to desert camo
3. GOGGLES- The Company currently issues several types of goggles including Gentex, Oakley, two types of Bolle Goggles, and the high speed built in fan goggles. We will never make everyone happy with goggles. But in my opinion the Bolle Tactical goggles work the best and fog up the least. The only problem with these is that they are single lens and could not be worn during Simunitions training. We need to start purchasing cases for any goggles similar to dive mask cases. These are inexpensive and will greatly increase the life of the goggles. Additionally many companies produce peel off sacrificial lenses that are applied to the goggles and removed as needed. We should standardize our choice of goggles and send each Plt. out with peel offs, spare lenses and cases. The most problems were experienced with our Simunitions mask. These are required during training, but they quickly become fogged to the point of completely obscuring observation must be removed in order to see accomplish the mission.
4. GARMIN GPS- This was one of the best purchases the Company ever made. The Garmin was used during all operations, and while it will never replace ability to navigate, it is an invaluable piece of gear. It enabled teams under canopy to fly directly to the DZ, provided rapid navigation on the move during vehicle patrolling and boat movements and gives the Marine the ability rapidly convert from grid to Lat /Long which was often required in Afghanistan.
5. THREE-DAY RUCK- The Eagle three-day ruck worked incredibly well for short duration patrols and D.A. missions in which more equipment was required. The only problem experienced was the rusting of metal attachment points. These were supposed to be replaced with plastic.
6. INDIVIDUAL CAMO NETTING- Two each (woodland and desert camo) nets were issued per man. These were used extensively to conceal individuals and equipment as well as to provide backdrops for OPs. These are essential pieces of gear and must continue to be provided to every man.
7. IFAV- Over all the IFAVs performed well. The training received was instrumental in our success in accomplishing multiple patrols and over seven hundred kilometers of movement. Time must be available for maintenance/PM after each patrol. This means that two vehicles are not enough to support continuous vehicle patrolling. In a perfect world each platoon could deploy with 5 IFAVs and 2 Trailers. This would allow two vehicle patrols to be run simultaneously with one vehicle in reserve. We were able to temp loan IFAVs from the BLT however, theirs were in poor condition due to misuse and we were required to prep the vehicles (remove windshields etc) before each use and replace after. Our biggest complaint was the tires. Due to the terrain extremely hard rock to extremely soft sand we were required to air up/down tires often. This contributed to many flats with the cheap non-bead lock tires. During the platoons vehicle-patrolling package, a request for equipment was submitted. Most of this gear was not purchased. We determined that had it been, many of our maintenance problems could have been avoided. The complete list of this equipment is included in the Mounted Patrolling After Action attached to this report.
E. EQUIPMENT DEFICIENCIES
1. CHOW-During a reconnaissance patrol the amount that can be carried is based on the amount of space available. Usually chow is the first thing to be discarded for room. An energy bar called the HOOAH bar is available through the system that is similar to a power bar and should be made available to Marines to supplement MREs while on patrol. Additionally, LRRP rations, and Cold weather rations should be available upon request.
2. COLD WEATHER GEAR- While in Afghanistan we were issued cold- weather system items including a Polar Fleece jacket, Cold weather balaclava, neck gaiter and extreme cold weather gore-tex gloves with liners. Unfortunately this equipment arrived too late to be of much use. This equipment should be issued to all Plt. members in the Company.
3. VIPER LASER RANGE FINDER- We were able to use this borrow this piece of gear from the Air Force Para rescue teams in Jacobabad Pakistan. It is a small laser range finder similar in size to our 7x50 Binos. It has a range of over 3,000M and is adjustable for units of measure. I have heard that a newer version can be attached to the Plugger and provide an instant grid to the target. The Company has tested the Night-star binos that have a laser range finer but these were not available to us. Our only method of accurately determining range was with the SOFLAM and this is too bulky to be used rapidly.
4. LAAW 2- We were able to acquire 8 of these from JSOTF assets in Afghanistan. The reliability problems of the old LAAWs have been fixed in this model and they are much more compact and are better suited for our purposes for both mounted and foot mobile patrolling.
5. GLOBAL CELL PHONE- During our deployment we had the opportunity to use the Iridium Global Cell phone The Motorola 9505 terminal without the tamper-proofing option (the upgrade is to allow for a data capability) is available now for $1400. The terminal can be used in the unclass mode indefinitely. The OSD policy will be that when the secure sleeves are available (Motorola is ramping up production now), the terminal with the sleeve must be purchased. When the ISM (Secure sleeves) become available we can send the terminal in to who can then perform the software upgrade and add the tamper-proofing, and also add the secure sleeve for about $2500 per terminal. The issue has not been worked out with MARCORSYSCOM yet however, these phones will allow the capability to transmit data and voice comm. From anywhere to any other iridium or secure phone.
6. ALLEN WRENCH SET- Our weapons and optics require a wide variety of Allen Wrenches to tighten. These are issued to the Plt. armorer loose. Small sets of inexpensive Allen wrenches which fold into a handle similar to a pocket knife are available at most hardware stores. These are easily dummy- corded to the individual Marine. A set of these wrenches should be included in the SOPMOD Kit.
7. GOGGLES/GLASSES- Due to the constant problems with our goggles, the 15th MEU purchased each Marine a set of Wiley-X glasses/goggles. These glasses had interchangeable arms/straps to allow them to be worn in either mode. The interchangeable lenses included clear lenses for nighttime shooting and driving as well as sunglass lenses. The ability to remove only one lens allowed the AN/PVS-14s to be worn while still protecting the eyes from dust caused by mounted patrolling. These glasses are fog resistant and also worked well during MFF operations.
8. CONCEALED HOLSTERS- 2nd Plt. was called upon to perform Personal Security Detail (PSD) Operations in East Timor. The situation in the country required the Marines involved to remain relatively low-key and carry concealed weapons. Several Marines had brought personal concealed carry holsters otherwise this would not have been possible. Each Plt. must deploy with at least eight concealed carry holsters
9. LOW PROFILE BODY ARMOR- As with the holsters mentioned above it would greatly enhance the capabilities of the Plt. if low profile wrap-around vests were available for issue through the Company.
10. (deleted as sensitive)
11. FLEX CUFFS- During our work up and deployment we were required to use large zip ties instead of actual flex cuffs designed to be used as restraints. These zip ties do not possess the same tensile strength as those designed as restraints. Fortunately our only prisoner was physically weak and unable to escape the cuffs. We may not be as fortunate in the future. A number of better products are available, and should be purchased.
12. DESERT BALACLAVAS- The Navy damage control teams use these. We were able to obtain some from them. These worked very well in the desert environment
13. GARMIN ARM POUCH- Several members of the platoon had purchased these from SSgt J. before he left the Marine Corps. They allow the Garmin to be wrist mounted and worked exceptionally well during vehicle movement as well as during free fall operations. They may be produced locally or purchased from Eagle Industries.
Guida Per Un Setup MFR Realistico - Parte II
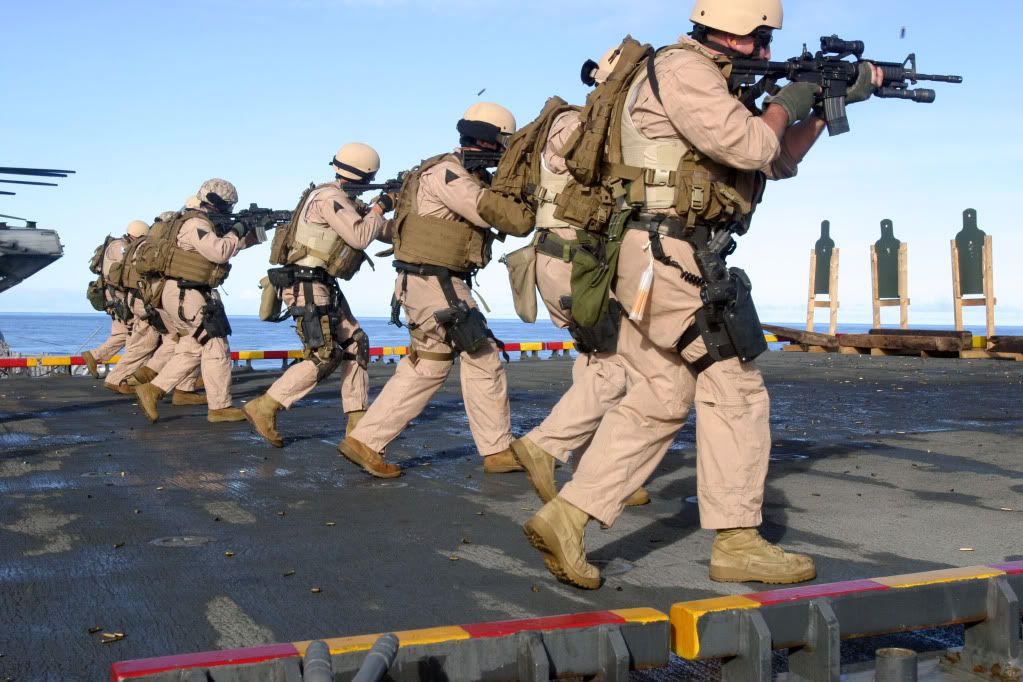
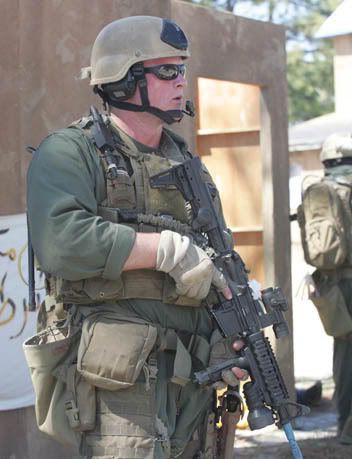
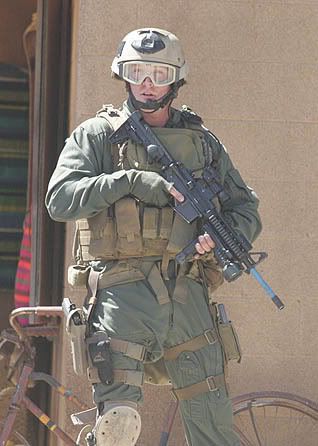
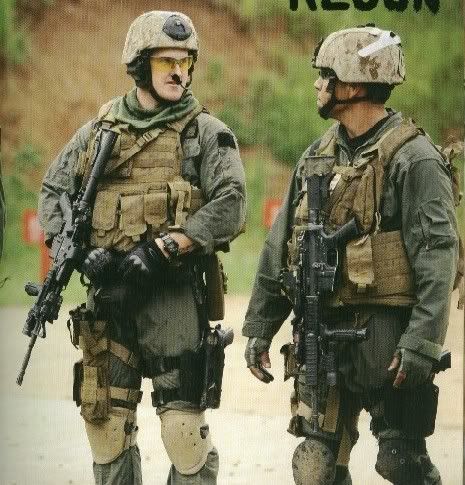
Subito dopo la prima adozione del kit FSBEII nel lontano 2003, si sono visti in varie sessioni di training del materiale con colorazione nera o il famoso "black-hardware" come cinutroni, fondine Safariland, ASP Baton Pouches, Surefire holsters etc oltre ad equipaggiamento in OD come la Recce Gear Dump Pouch e ovviamente altro. Ecco una perfetta immagine dimostrativa.
Unaltro elemento particolare da poter aggiungere ad un setup è un tubo di PVC posizionato molto frequentemente sul backplate del MBSS o di altri vest. Quest'ultimo serve ad ospitare i cosidetti breaching tools.
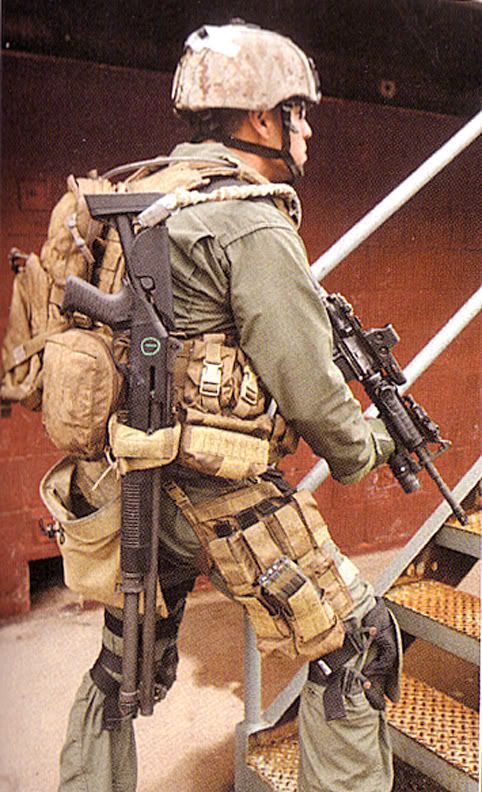
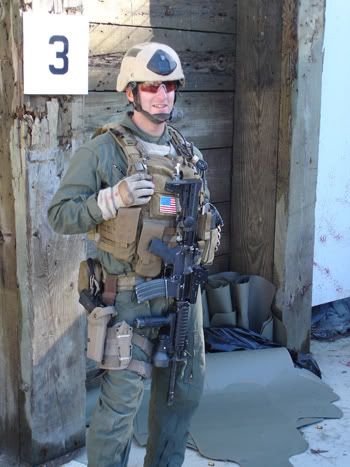
A volte il drop leg panel viene piegato su se stesso per renderlo meno ingombrante. Quando viene portato in questo modo, di solito si vedono posizionate delle pouch da .45 o una shotgun shell 24rd pouch come si può vedere in questa foto:
Siccome ne abbiamo già fatto menzione in precedenza, ecco qui una foto con i TFSS e la SEA MKII (HABD). Solitamente i TFSS vengono posizionati esclusivamente sulla belt, mentre lHABD viene di frequente portata sul backplate o sul cinturone in posizione orizzontale.
Un'altro articolo che viene di sovente dimenticato nei setup MFR, ma usato spesso nei contesti operativi reali, è la CSM Gear Surefire Holster. Di solito ospita una Surefire G2 Tan ma non solo, infatti si sono viste altre torce tipo la G3 sempre Surefire.
Una foto un pò particolare dove si vede il calcio Magpul. Questo genere di modifiche aftermarket si vedono in alcune rare occasioni.
I vari Gerber multitool, Benchmade Nimravus, e .45 / M9 mag. pouches sono frequentemente montate sugli strap delle Safariland 6004 come si può vedere di seguito.
I fucili sono frequentemente catalogati tramite delle numerazioni/iscrizioni con dei pennarelli bianchi o blu sul receiver, calcio e accessori del fucile stesso (o piu' recentemente tramite QR Code). La ragione dietro a questo procedimento è quello di rendere la vita più facile agli armieri, cosi da poter riconoscere con esattezza quali acessori appartengono ad un particolare fucile e sopratutto per far si che quest'ultimi componenti rimangano assieme e non vengano a mancare. Vorrei anche sottolineare che i fucili completamente pitturati non sono consoni ad un setup del genere se non in rari casi.
Come accennato in precedenza il tipo di calciatura piu' diffusa è la versione LE, ma può andare bene anche la pala a quattro posizioni o il crane.
Generalmente il CIRAS è uno dei vest più comuni, ma ovviamente anche l'MBSS e l'RRV vengono utilizzati in egual modo per tipi di operazioni differenti. Qui la decisione è abbastanza ampia, e di conseguenza uno può scegliere quello che più gli piace. In termini di capacità di carico tramite i PALS MOLLE, il CIRAS è nettamente superiore e a ruota seguono l'RRV e l'MBSS. La Molle belt e il dropleg offrono dello spazio extra per quanto riguarda il carico di pouches. Per un certo periodo le SOP (Standard Operating Procedures) per gli MFR erano di 7 caricatori obbligatori per l'arma secondaria.
Per quanto riguarda le chemlight sia quelle IR che quelle standard sono utilizzate per diversi scopi, come per esempio segnalare delle stanze ripulite, MEDEVAC e Identificazione.
Per la 3rd line (gli zaini) la scelta ricade tra l'ILBE Main Pack/Assault Pack in dotazione a tutto il corpo dei Marines o meglio ancora, ma di difficile reperibilità il patrol pack fornito nel kit FSBEII.
Per le protezioni invece sono praticamente utilizzate solo le ginocchiere Alta in 3 Col. Desert (il quale sembra tan), Coyote Brown e ovviamente nere.
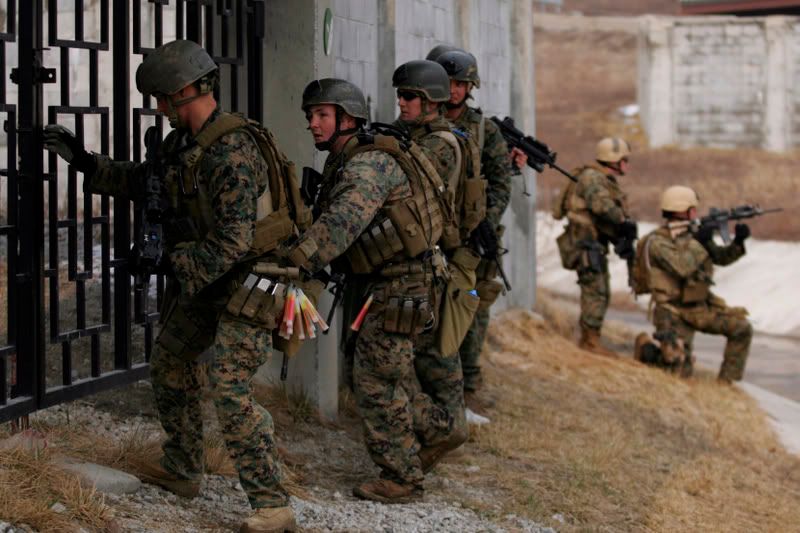
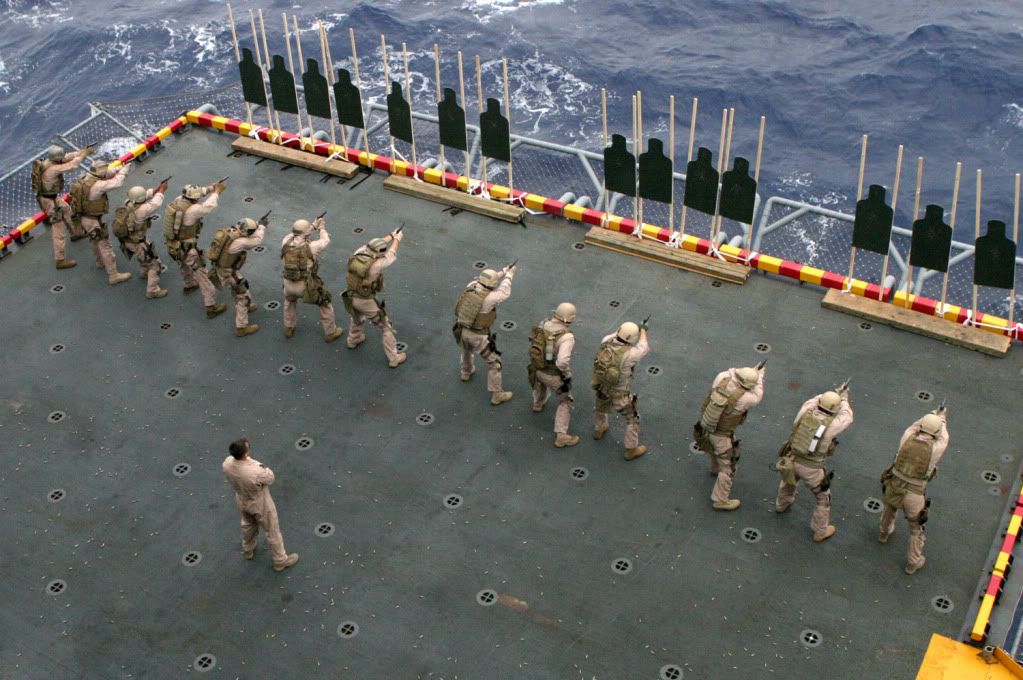
Se date un'occhiata al primo operatore nella fila, noterete che ha una SAW pouch capovolta sulla schiena cosi da poter ospitare una maschera antigas. La pouch girata (viene spesso fatto anche per le grenade pouch) permette all'operatore un'estrazione decisamente più rapida rispetto alla normale posizione. Anche se ovviamente tutto ciò comporta un rischio più elevato, in quanto il contenuto potrebbe scivolare facilmente fuori una volta aperta la pouch.
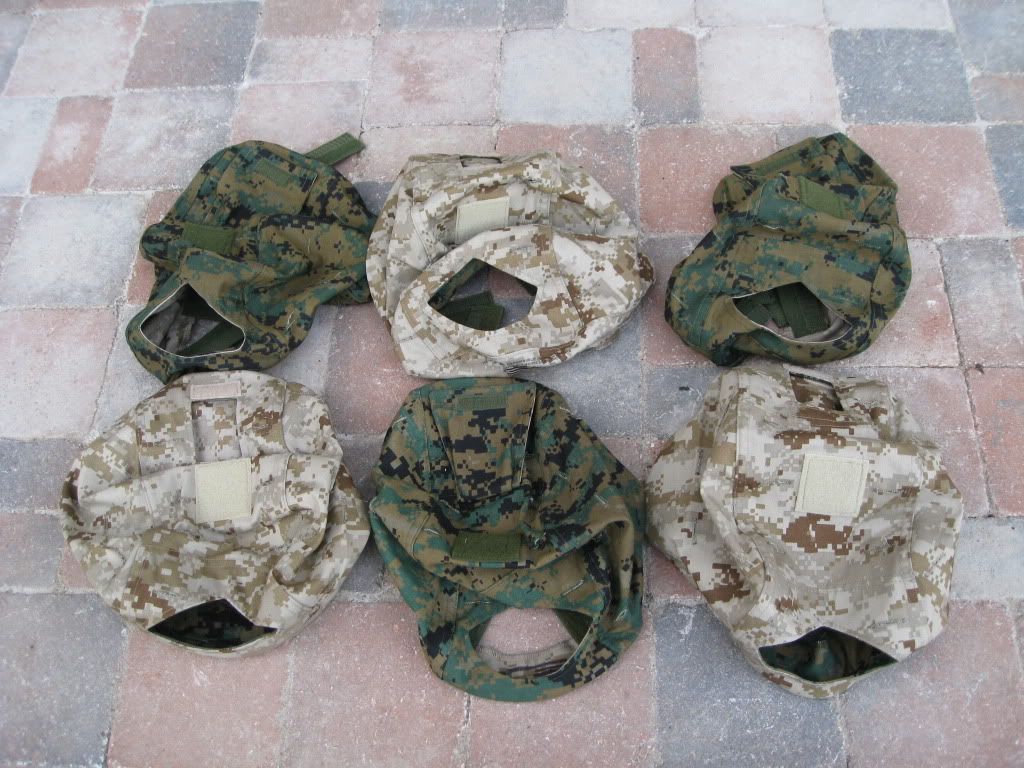
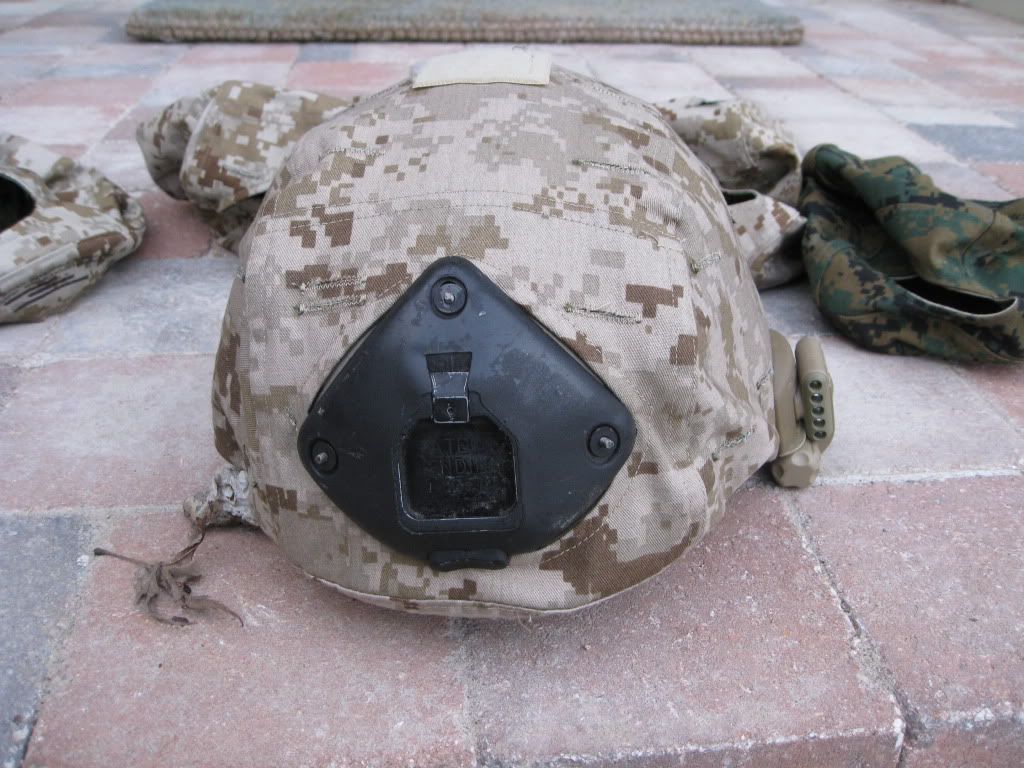
La helmet cover è un'altro punto saliente del kit FSBEII, in quanto è nettamente diversa da quella per i classici LWH/MICH, siccome ha un taglio specifico per ospitare il Norotos mount/shroud. Questa tipologia di helmet cover issued nel kit FSBEII è ovviamente abbastanza rara, e quindi difficile da trovare. Se non si vuole aspettare e/o spendere troppo per il modello originale, si può tranquillamente utilizzare un'helmet cover sempre USMC e ritagliare lo spazio centrale per il Norotos. Le maggiori differenze rispetto ad un'helmet cover normale sono come già detto la predispodizione ad ospitare il mount Norotos. Ma inoltre c'è un quadrato 2x2 di velcro sulla calotta in posizione centrale (Tan nel lato desert e OD nel lato woodland). Per finire nella parte posterire c'è un rear flap di forma triangolare e gli strap di velcro per agganciare la cover all'elmetto sono verdi invece che neri. Ovviamente anche la tag è diversa dal modello normale, però c'è da dire che è sempre la stessa marca che produce ambedue le versioni. Tutt'ora credo non siano più in produzione in quanto nei setup contemporanei vengono usate molto raramente (più adatte per setup 2005/07).
Vedute di tutte i due lati, velcro e rear flap triangolare. (Non preoccupatevi se le tag non sono identiche in quanto variano leggermente da versione a versione, e in alcuni casi non sono presenti del tutto).
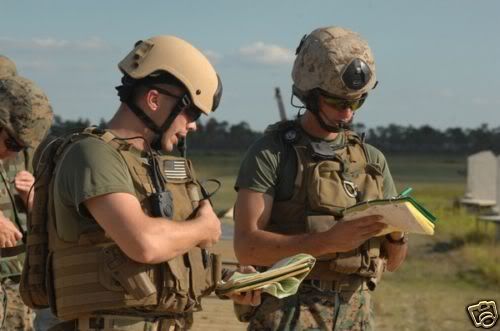
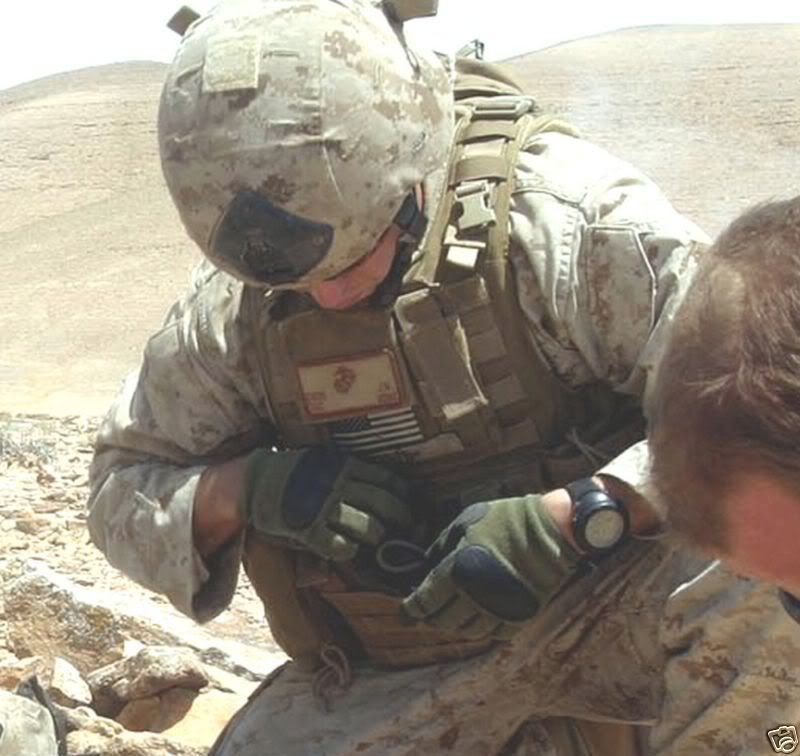
Foto del loro utilizzo
Un'altro oggetto abbastanza unico da aggiungere al proprio setup è l'Entry Tool Holder. Ci sono svariate opzioni da cui prendere ispirazione. Per prime in assoluto quelle home made con dei tubi di PVC e delle ziptie per agganciarle ai backplate dei vest, o in alternativa la DBT (Diamond Back Tactical) fa un modello apposito decisamente più sofisticato.
Un''ultimo dettaglio sugli elmetti è quello di sprayare un numero di identificazione sugli earflaps (dette bunny ears) del TC2000/MICH. Tipicamente è una lettera seguita da un numero; tipo F-27 o qualcosa di simile. Oltre a tutto ciò che è stato detto finora le EMT Sheers sono talvolta assicurate al tattico tramite i PALS MOLLE presenti sul vest. Un'altro dettaglio da poter includere per migliorare il proprio setup.
Conclusione:
Credo sia inutile dire che un setup del genere è naturalmente costoso di sua natura vista la quantità di materiale da reperire, e sopratutto se si vuole equipaggiamento di produzione militare e non civile. Consiglio a quelli che intendo avvicinanarsi a questo tipo di setup di guardare attentamente le ref. pic, documentarsi nel FC e prender nota di tutti i dettagli necessari per far si che un setup mediocre diventi veramente ottimo.
Guida Per Un Setup MFR Realistico - Parte III
FSBEII Ciras Land
FSBEII MBSS S/M
FSBEII RRV
PACA (Mil. version)
FSBEII Kit Bag
FSBEII Patrol Pack & MAP
FSBEII Hydration Pouch
FSBEII Weapon Catch
FSBEII SEA MkII Pouch
FSBEII 3-Mag Bandoleer
FSBEII 24rd Shotgun Pouch
FSBEII Drop Leg Panel
FSBEII SAW Pouch
FSBEII Gas Mask Pouch
FSBEII M4 Single Mag Pouch
FSBEII IFAK/Med Pouch
FSBEII Dive Belt Adapter
FSBEII RRV Adapters
FSBEII SAW Pouch
FSBEII .45 FB Pistol Pouch
FSBEII 3-Mag Carrier (Shingle)
FSBEII Canteen Pouch
FSBEII Smoke Pouch
FSBEII MBITR Pouch
FSBEII M60 Pouch
FSBEII Flashbang Pouch
FSBEII Frag Grenade Pouch
FSBEII Admin Pouch
FSBEII Admin Pouch w/light
FSBEII E&R Fanny Pack
FSBEII Protech Sig Gloves
FSBEII Holster Adapter
FSBEII Baton Pouch
FSBEII M4 FB Single Mag Pouch
FSBEII MOLLE Warbelt
FSBEII Benchmade Nimravus
FSBEII Helmet Cover
FSBEII Oakley A Frame Goggles
MSA MICH TC2000 Helmet
Norotos Three Hole Mount
CSM Gear Dump Pouch
CSM Gear Surefire Holster
Safariland 6004-56 Holster


 Rispondi quotando


 la rep+ più e il dirti che è una della migliori guide che ho letto sui set up è poco......